
When I teach rug hooking, my students begin by wrapping the backing fabric around their legs, so their lap becomes the “frame.” However, some people find sitting in that way uncomfortable, especially in the hot summer (not a good time to wrap yourself up in a wool rug!). Frames can be an excellent help and over the years, I have developed a simple, sturdy frame that works great, and is also quite easy to make.
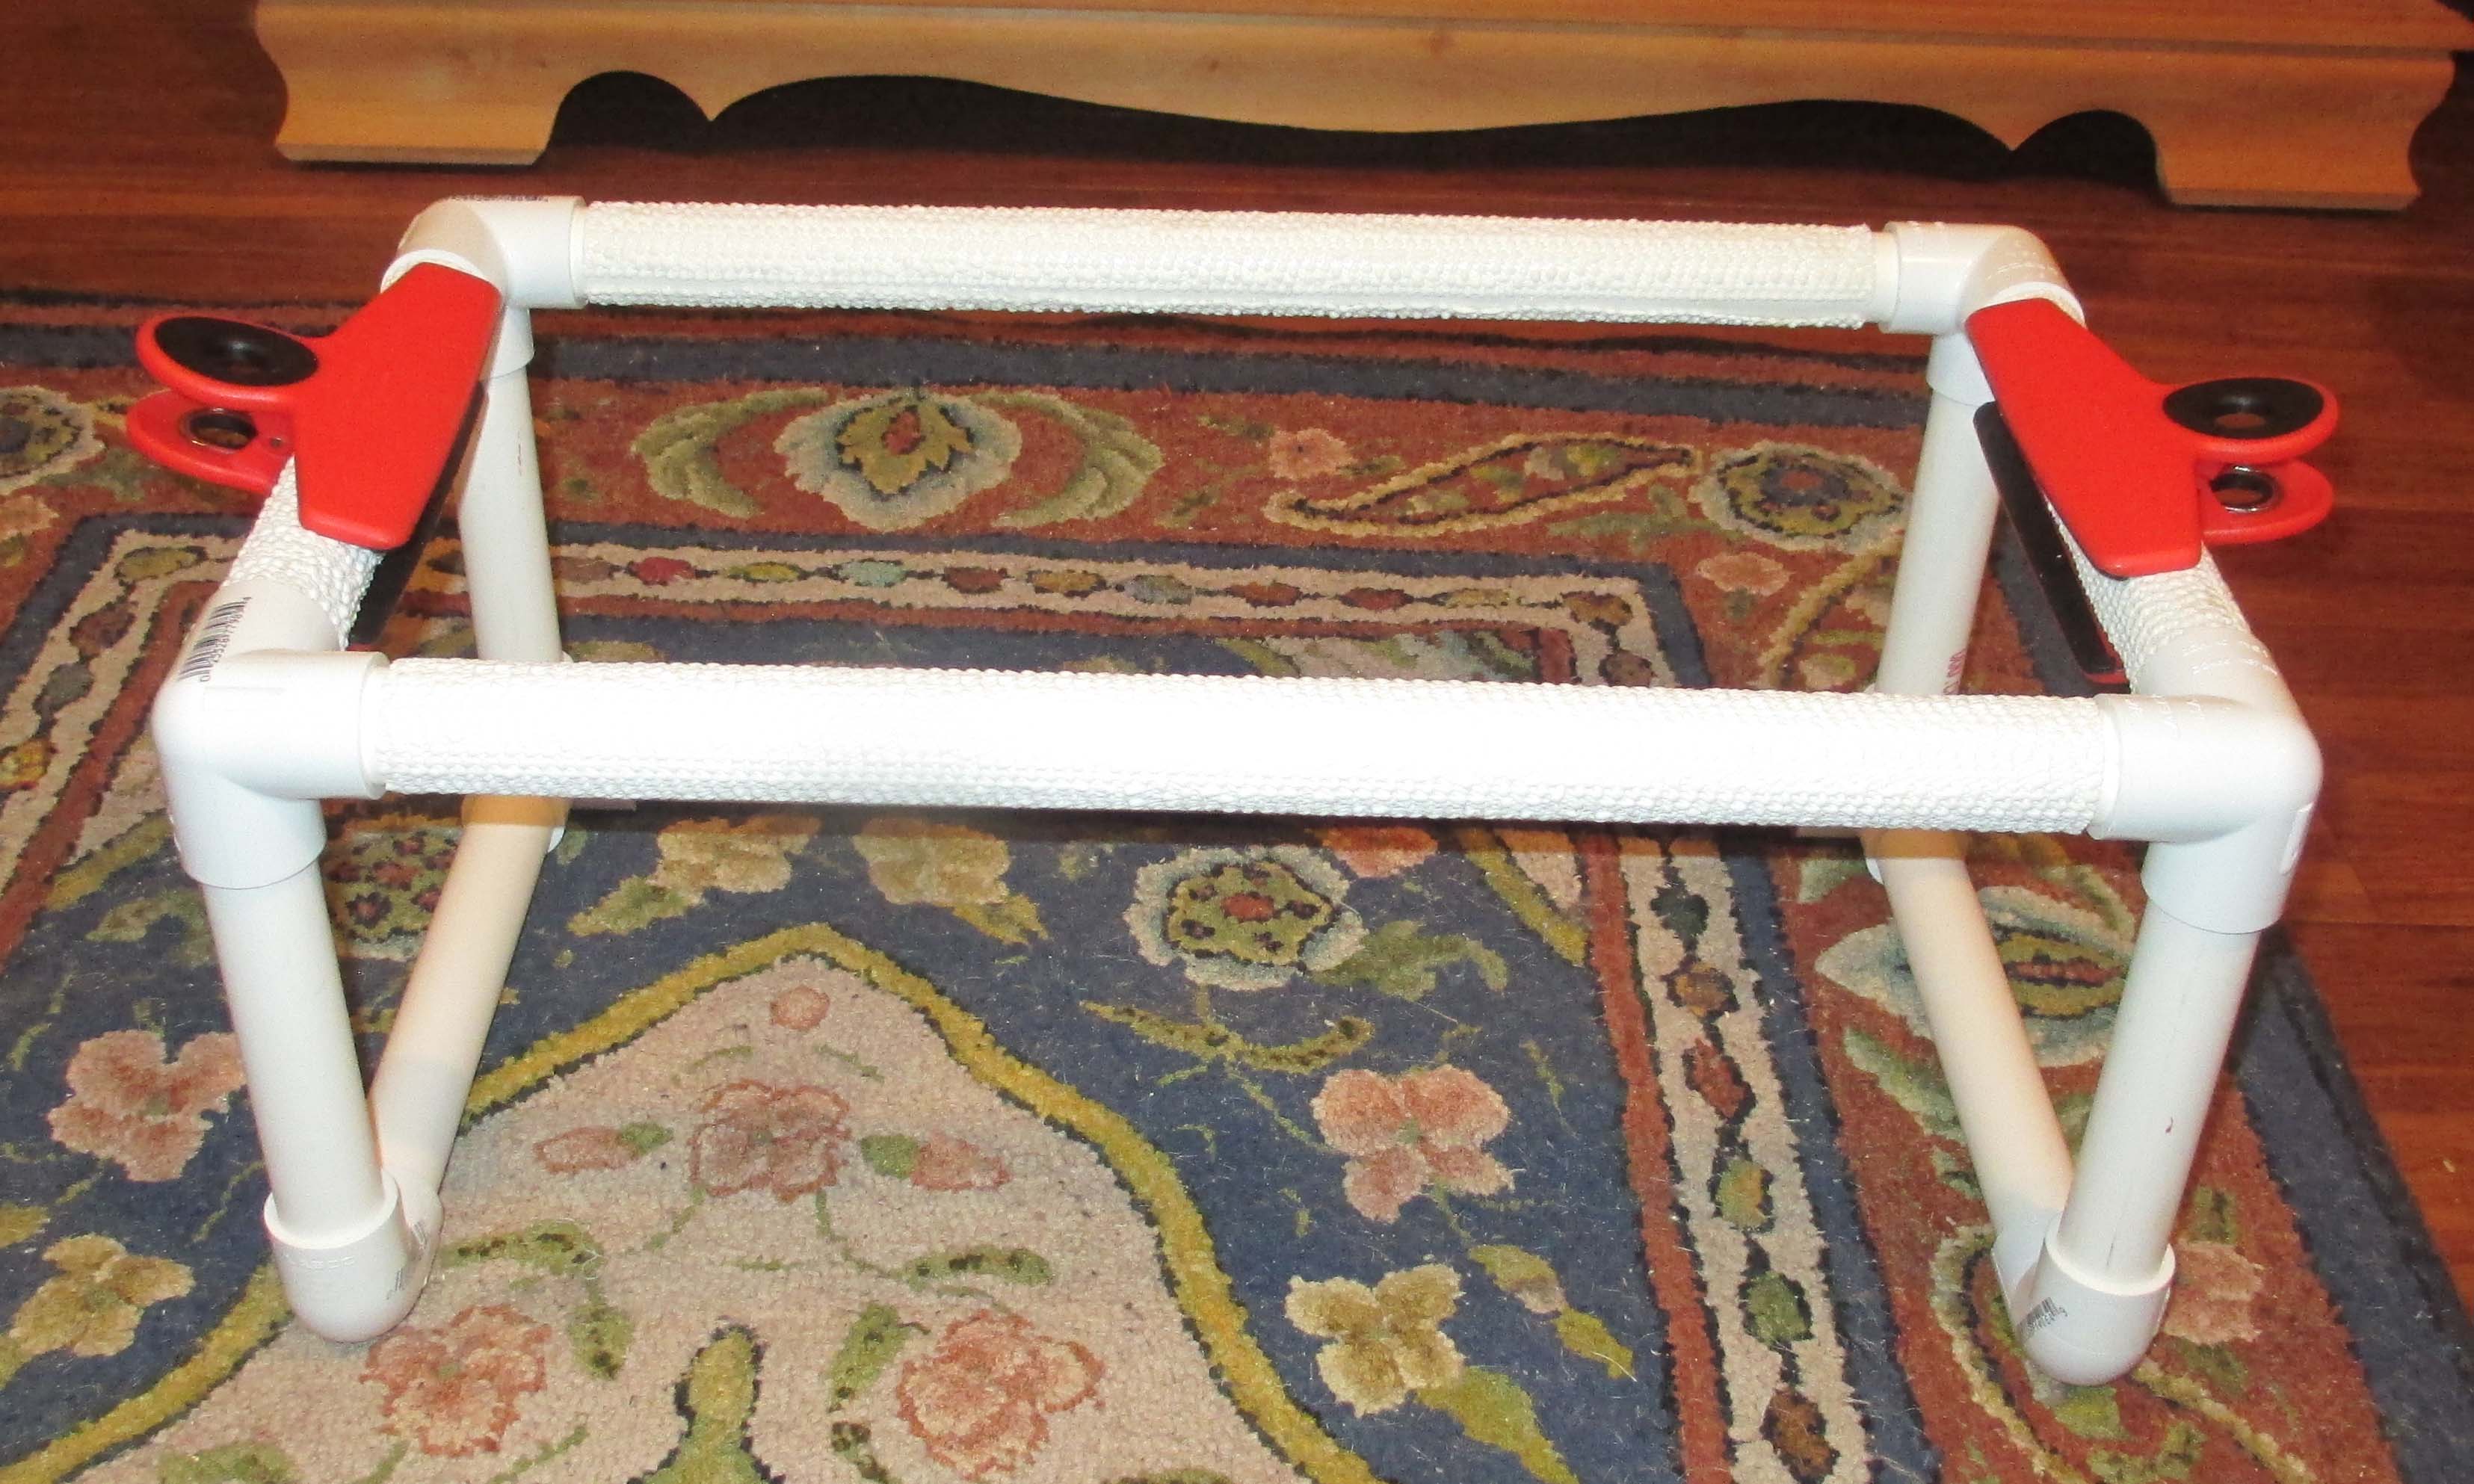
My Playing Hookey Frame is made of PVC pipe, and if you are at all handy with a saw and glue, you can make one yourself. There are no nails or anything sharp on my frame. The top has a rubberized surface, and the backing fabric is attached using two large kitchen clamps. It can be used as a lap frame, so you can sit on a couch at home. It can also be used as a standing frame, which is most convenient to bring to meetings or shows.
I sell these frames at my shows, but I have found that it is kind of expensive to ship them, especially shipping overseas. While the frame only weighs 2.2 lbs, it must be shipped in a large box, so that is an added cost. And since they are so easy to make, I thought I would put the instructions up so anyone can do it.
Another advantage to making your own frame is that you can customize it. Go ahead and cut the pipes in the recommended lengths, but before you glue the pieces together, slip them together with the fittings and see if you want to lengthen or shorten the legs, widen the frame, etc. It’s easy enough to cut new pipes to get your frame just the way you like it.
To make your own Playing Hookey Frame, you will need:

2-10’ long 3/4” PVC pipes, 200 PSI
2-3/4” Dia 90 degree PVC Sch 40 Slip Elbows
6-3/4” Dia 90 degree PVC Sch 40 Side Outlet Elbows

2 OXO Large Kitchen Clamps
Goop Glue
Rubber shelf liner, cut into 2-3.5”x7” and 2- 3.5”x15” pieces
The top and bottom sections of your frame will be glued together. The legs (both for the standing frame and the lap frame) slip in and out, so you can easily switch from the standing frame version to the lap frame. The two clamps go on the sides of the top section. You will lay your pattern over the top of the frame, clamp one side, then tug down on the backing and clamp the other side. (You can also add two extra clamps to the top and bottom of the top section if you prefer) There is no limit to the size of rug you can hook on this frame, since the rug can easily be moved around on top as you hook each section.
STEP ONE:
Cut your PVC pipes in the following lengths:
4- 8.5”
3- 16.5”
4- 24”
4- 5”
STEP TWO: Wash the pipes (I have found they are pretty grimy when they come from the hardware store)

STEP THREE: (above) Glue a Side Outlet Elbow to either end of a 16.5” pipe. Do the same on the other 16.5” pipe. Check that each is the same length.

STEP FOUR: (above) Glue the two top sections together using 2-8.5” pipes.

STEP FIVE: (above) Glue the two Side Outlet Elbows to the third 16.5” pipe. Glue the remaining 8.5” pipes to the corners, then glue the Slip Elbows to the 8.5” pipes. Line up all of your corners with the top section, then slip in the 5” legs so the frame will dry square. (See below)
(DO NOT GLUE the legs. You want to be able to switch from lap frame to standing frame, so only the top and bottom sections should be glued together)

STEP SIX: (above) Glue the rubber shelf liner pieces to the top of the frame. Let the glue dry for 24 hours.


The Featured Rug of the Month is a new design called Demelza. This is a great project for using up leftovers, since most of the colors were from skeins that were 2 oz or less (you KNOW you have that much in your stash!). You can read about it at http://www.littlehouserugs.com/featured-rug-demelza-september-2015.html
For the month of September, subscribers to this blog can purchase the Demelza pattern on linen for 20% off. Go to http://www.littlehouserugs.com/blog-special-september.html to order.

Blog subscribers can also send for a free Rustic Rainbow yarn sampler (normally sells for $6.00) during the month of September. The sampler consists of 1.5 oz in three colors, and is great for rug hooking, knitting and felting. Go to http://www.littlehouserugs.com/blog-special-september.html to order.

On September 19, I will have a booth at Second Use Handmade Market in Seattle, WA. I will have a booth the following weekend (September 26-27) at the Oregon Flock and Fiber Festival in Canby, Oregon. Come and say hi if you’re in the area!
I will also be teaching a Beginning Rug Hooking Class at OFFF on Friday, Sept. 25. To sign up, go to http://flockandfiberfestival.com/ws-512-beginning-rug-hooking/. This class fills up so it’s best to sign up right away!

And don’t forget that for every $50.00 you spend between now and November 25, 2015, you will be entered to win this Hand-hooked Victorian Santa (valued at $165.00).
Happy hooking!

What a fantastic idea rug hooking is fairly new in australia ezpecilly as i live in the outback people like you help me a lot thank you gail
LikeLike
I am going to make this.
LikeLike
At last! I have been searching the interwebs for such a plan. Thank you!
LikeLike
Thank you so much for sharing your plan!
LikeLike
Thank you! Husband will be making this for me this weekend. Received your book today and excited to get into it. :-). Looks wonderful!
LikeLike
Thank you, so much for sharing your knowledge. I so want to learn how to create through hooking and your info is so illuminating. Thank you for being so clear.
LikeLike
Thank you so much for sharing this! I plan on making one for my mother. I have one question. Under materials, it says 2 “10′ 3/4″ pvc pipes” does “10′ ” mean ten feet or ten inches? I am guessing inches hah. Thank you
LikeLike
Yes, ten feet.
LikeLike
how can I print out the instructions
LikeLike
Did you try right clicking on the page, or pressing the control key and p at the same time?
LikeLike
Im probably doing something wrong, but it isn’t working.
LikeLike
Email me at judytaylor@littlehouserugs.com and I’ll send you an attachment with the instructions. Thanks!
LikeLike
Thank you so much for instructions on to make frame. I just made 2 Christmas socks it work been easier frame.
Thank you
LikeLike
Thank you for this pattern! Brilliant! And you are so generous to do that even though you sell them! I have been looking everywhere for a frame that is both affordable and can be used for a variety of sizes (without damaging the wool on edges). I can hardly wait to make mine! I ill be checking your web site for your book mentioned in another comment.
LikeLike
I made the frame to do a locker hooking rug. What a lifesaver as I’m almost done with my granddaughters rug for Christmas. 28″x42″ and I could have never done it without the frame. Thank you so much for the rug frame instructions!
LikeLike
My birthday is coming up in a few weeks and my husband will be making me one, I use only yarns for my rug hooking and I have looked for several years for something other than using hoops. Will let you know how it has work for mu when I start using it. Double my thanks for sharing the “how to do it” Marie-France
LikeLike
Great! You will need the OXO clamps (two clamps, one for each side). You lay your backing over the top, clamp one side, then pull down on the other side and clamp it. Your clamps should stick out like wings. You can add an extra set of clamps for the top and bottom, butI don’t find that necessary. It is very easy to move the rug around as you finish an area. When your hubby cuts out the pieces, it’s a good idea to slip the pieces together without glueing them so you can see if you’d like to change the dimensions.
LikeLike
Thanks so much for sharing the PVC frame directions. I made myself one two evenings ago.. simple to make and I really like it. Makes moving around to various places on your rug so easy and doesn’t pull out the wool. I have three other ” styles” of frames. So far this is my favorite. Thanks again.
LikeLike
Wow! Thanks for that!
LikeLike
My husband successfully made the frame and it’s wonderful except I could not get these wide clamps here, a suggestion was made to try to get a pipe a bit bigger than what the frame is made of and more flexible and slice the middle to clamp it over the sides, will try that out and let you know the results. Marie-France
p.s. what a neat idea, this frame
LikeLike
Have you tried searching for the OXO clamps online? If you can’t find them there, you can order them at http://www.littlehouserugs.com.
LikeLike
I just made this frame and love it. By far, the easiest frame to work with. Thank you so much. Will you be in the Seattle area again? I live in Renton and would love to meet you. I am teaching myself to hook with Amy Oxford’s punch needle.
LikeLike
Wow wow that’s great .i make rag rugs .At the moment but want to make proddie rugs will get what I. Need to make the dream
LikeLike
I have been trying for MONTHS to get the slide (tee) elbow. No store here in Canada carries them. Plus any Amer. base store ie. .Lowes or Home Depot cannot cross border order the Tees elbows don,t know what yur Pres. is natting about Nafta for. Apparently Cndn. stores did stock them but now can,t get from suppliers. My Hubby thinks its because of willy women, like yourself, that make things with all the parts. Friends went to a nascar race and tried at 2 Amer. stores but they too said it wud be a special order, one said a customer made his own canopy tent. Oh well!
LikeLike
Couldn’t I just mail them to you?
LikeLike
Hi !!
You can order them to Lee Valley Tools in Ottawa, you can order them online, this is where I got mine. Marie-France
LikeLike
Yu wud be my # Wily Woman if yu cud purchase and ship to me. How wud I pay yu?? I,as yu know, need 6 side elbows. I can get everything else here,just 3 km. away. OR cud a company ship to me / yur rug co.??. I eagerly await yur reply. Susan
LikeLike
That was # 1 W.W. SPS
LikeLike
Ms. Judy #1W.W. I have finally got the side elbows coming my way. Thank Yu for yur time and the plans for the rug frame. Susan
LikeLike
Great!
LikeLike
Thank you for sharing your plans. I am excited to learn this craft and was looking for an affordable frame! I am excited to make my own!
LikeLike
I sure appreciate you sharing the directions for making this inexpensive rug hooking frame. Once I gathered all the supplies , it was really pretty easy to make. I am waiting for the glue to dry and then I can try it out. Can’t wait!!!
LikeLike
I’m so glad! Enjoy!
LikeLike
Judy, my daughter (13) keeps her own flock of Karakul sheep and has wanted dearly to hook on something bigger than an embroidery hoop can handle. But other frames are SO expensive!!! We found your plans and built this today. Super excited to use this! Thank you so much for sharing.
LikeLike
Thanks!
LikeLike
Would this work for punch needle. They are smaller.
LikeLike
Yes, it works great for punching, you just need the extra set of clamps for top and bottom.
LikeLiked by 1 person
I’m curious if anyone has made this frame in a larger size and if so, were you pleased with it?
LikeLike
I think what’s great about doing one for yourself is that you can customize it to your own needs/preferences.
LikeLike
And by the way, Judy, thank you so much for your generosity in sharing these instructions! I can’t wait for the finished product!!!
LikeLike
Thank you so much for sharing your frame plan.
LikeLike
That’s a good one, but did you know I did an updated design? The new one lifts the work up so you don’t have to bend your neck. You can find it here: https://judytaylor2013.wordpress.com/2017/08/30/build-a-better-rug-hooking-frame/
LikeLike